How To
Using Webhooks
HTTP requests on Fider's events
Webhooks are a powerful integration feature that allow you to propagate events from Fider to other applications.
Events happens when users interact on Fider. Four types of events currently exists, but more of them could be created in the future.
Webhooks are highly customizable and you can create as many webhooks as you need for each event type.
Create a new Webhook
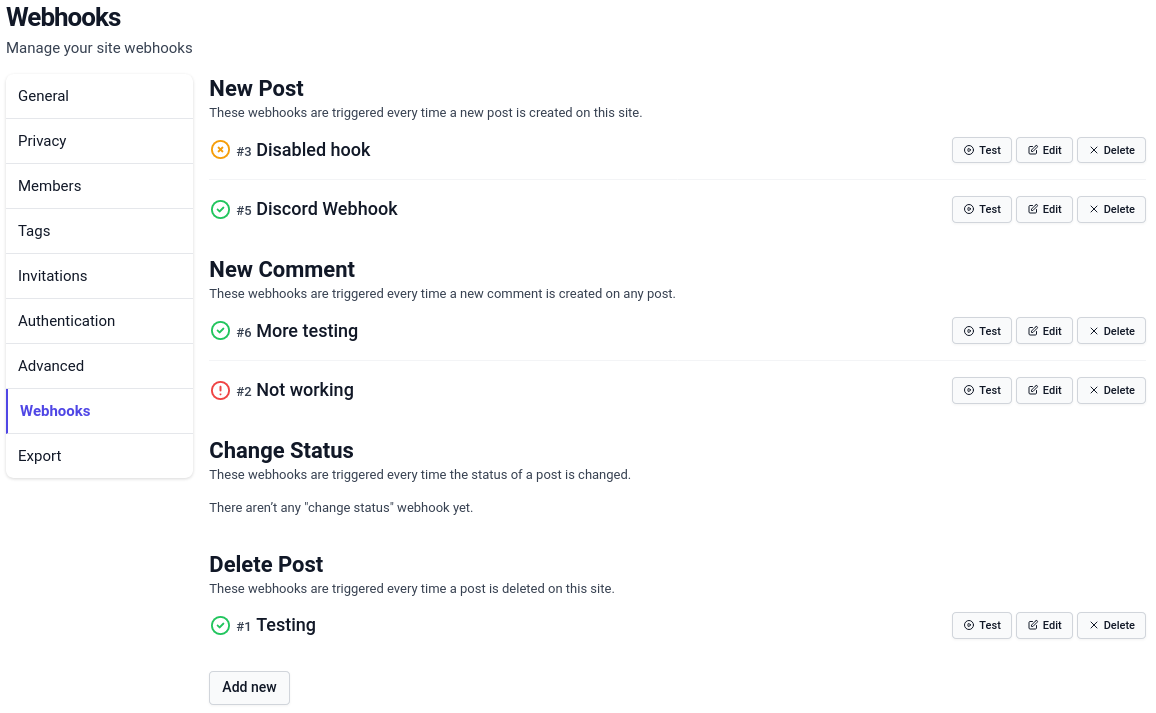
While logged in as an Administrator, navigate to Site Settings -> Webhooks.
This page list all created Webhooks, either Enabled or Disabled. To create a new one, click Add New and fill the form with all the required information as explained on the section below.
Webhook configuration
The power of this feature reside in its customization. Each Webhook has a name for you to quickly recognize it, a type defining its trigger event, a status so you can enable or disable it, an URL and a content both formattable using Go templates, an HTTP method used to perform the request and even a set of additional HTTP headers.
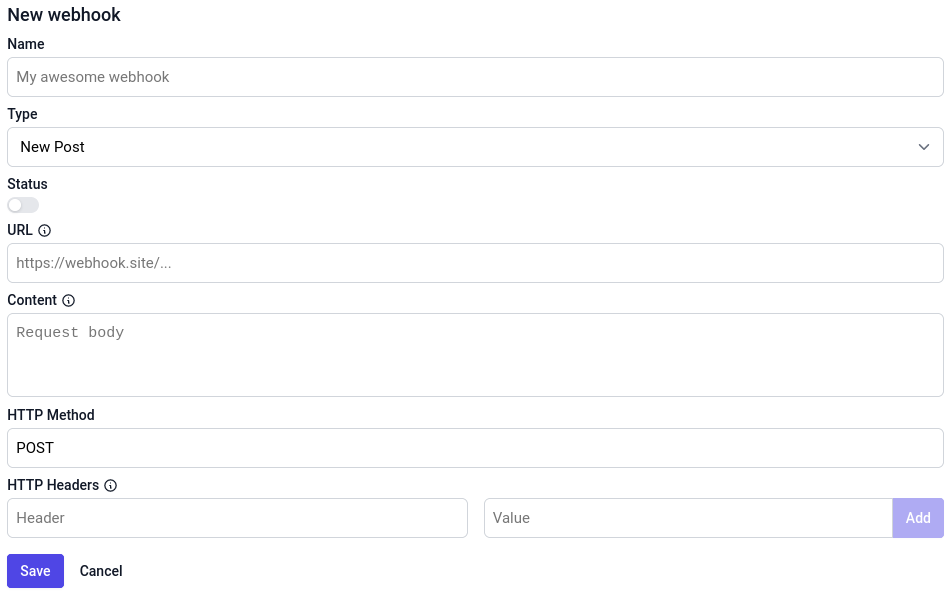
Name
The name is used in the admin control panel to identify the Webhook. You may give the name you want, it'll never get shown to users or sent in the request.
It do not needs to be unique: a unique ID display with a # symbol is always included with the name so you can distinguish two Webhooks with the same name.
Type
The type define which event will trigger this Webhook. It's also used to categorize them on the admin control panel. As new events could be added in future, this attribute is subject to modification.
Status
The status define whether the Webhook is active or not. We highly recommend you to test your Webhook before enabling it. When the execution of a Webhook fails, it'll automatically get disabled until you edit and fix it.
URL
The URL is one of the most important parts in the Webhook definition. Indeed, it is part of the definition of the HTTP request that this Webhook perform. This is usually defined by your targeted application, and you must refer to its documentation to know how to get one. See the list of common Webhook targets that you probably want to integrate with below to get some help with them.
Content
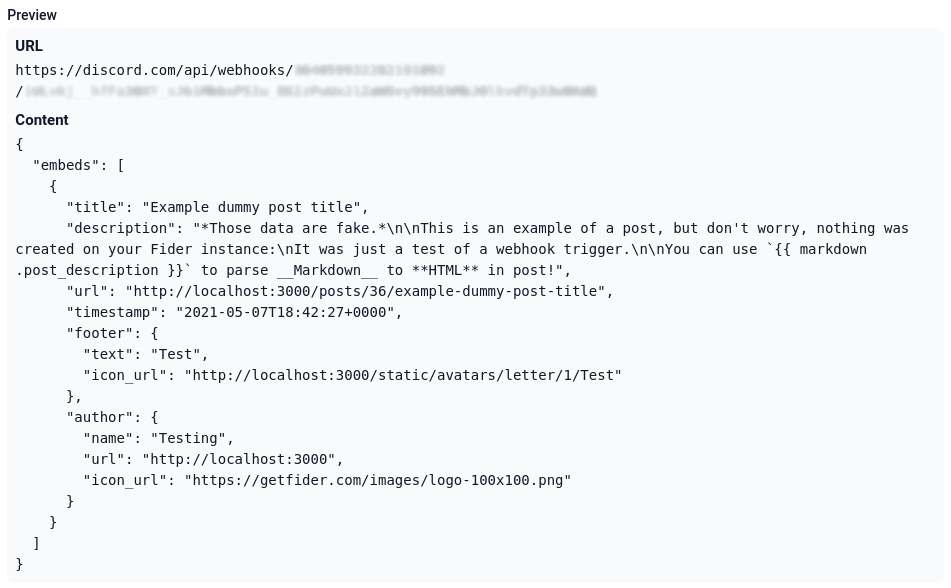
The content is the main element in your Webhook. You define here the data sent as HTTP request body. In most cases, the payload will include information about the event that triggered it. Just like the URL, you can also use Go template formatting here. Do not hesitate to check the integrated help section by clicking on the information icon next to it. Take a look at the Preview zone to see what would your request contains with example data.
HTTP Method
This is the HTTP request method of the request triggered by the Webhook. In most cases, when sending
data in the Content, the HTTP method will be POST. Check your targeted application's documentation to be sure.
HTTP Headers
You can add any HTTP headers you want here. Each header have a name and a value, and you cannot define the same header twice. The most common headers are:
Content-Type: use it to tell your application the MIME type of the data represented in your Content. Common values are:application/json,text/plain,application/x-www-form-urlencoded,application/xml...Authorization: use it to authenticate with given credentials.
Writing Go templates (for your Webhook URL and content)
The preview field
When writing templates, a preview is available before saving you check when it'll look like. Use it as many times as you need!
Presentation
Go templates are a way to customize a text using external values (also called here "properties"). The engine used here is the
native text/template Go package. This is a powerful engine, but creating a basic templates is not complicated. You can write text as you want and insert a
property name, prefixed by a dot, enclosed in double braces with space within to place its value. For example, this is the most basic template with some values:
Template
A new post entitled "{{ .post_title }}" has been created by {{ .author_name }}.
Rendered text
A new post entitled "Example dummy post title" has been created by Test.
In addition to properties, you can also use "functions", which are really useful to perform operations on values before they got inserted in the text. Example: (Read more about time formatting here)
Template
The post was created on {{ format "Monday, 02 Jan 2006 at 15:04:05" .post_created_at }}.
Rendered text
The post was created on Friday, 07 May 2021 at 18:42:27.
To adapt the content dynamically depending on a property's value, you can even use "control structures", such as conditions and loops!
For example, you may add an element for post tags (also note the use of the minus sign - to trim lisibility white spaces):
Template
The post have {{ if len .post_tags -}}
  {{ len .post_tags }} tag {{- if gt (len .post_tags) 1 -}} s {{- end }}:
  {{- range .post_tags }} {{ . }} {{- end -}}
{{- else -}}
  no tag
{{- end }}.
Rendered text
Post with tags
The post have 2 tags: tag1 tag2.
Post without tag
The post have no tag.
When using function call result as another function's argument, don't forget to parenthesis the expression: {{ quote (format "15:04:05" .post_created_at) }}.
You can also use a pipe character (|) to chain calls: {{ .post_created_at | format "15:04:05" | quote }} or {{ format "15:04:05" .post_created_at | quote }}.
Since the double braces are special characters in templates, if you need to insert them in your text, use the following trick: {{ "{{" }}. Do not hesitate
to consult the official Go documentation about templates to see what are the possibilities.
Security disclaimer
You should always keep in mind user content may be insecure! Posts title and description, comments or users name are free text directly from the users. You need to properly encode values like that when using them in JSON fields for example. The following example is a bad configuration:
{
  "message": "{{ .post_description }}"
}
A malicious user could create a post with this description:
Hacked!",
"important": true,
"from": "admin
When the template will be executed, the final result will look like:
{
  "message": "Hacked!",
  "important": true,
  "from": "admin"
}
The targeted application may interpret the "important": true as a message requiring a notification and use the from field to set the sender. Thus, people
will receive a notification for a message from the admin saying "Hacked!". Pretty scary.
Please avoid these trouble and use the safety functions like quote, escape, urlquery, stripHtml...
The correct configuration would be (note the external quotes have been removed too):
{
  "message": {{ quote .post_description }}
}
List of properties and functions
You can find theses information in the integrated help by clicking on the information icon next to the URL and Content fields.
Properties
| Property name | Example value |
|---|---|
author_avatar | https://yourapp.fider.io/static/avatars/letter/1/Test |
author_email | test@test.fr |
author_id | 1 |
author_name | Test |
author_role | administrator |
comment | An example **comment** on a post. |
post_author_avatar | https://fider.io/images/logo-100x100.png |
post_author_email | contact@fider.io |
post_author_id | 7 |
post_author_name | Fider |
post_author_role | visitor |
post_comments | 3 |
post_created_at | 2021-05-07T18:42:27Z |
post_description | *Those data are fake.*<br /><br />This is an example of a post, but don't worry, nothing was created on your Fider instance:<br />It was just a test of a webhook trigger.<br /><br />You can use `{{ markdown .post_description }}` to parse __Markdown__ to **HTML** in post! |
post_id | 36 |
post_number | 36 |
post_old_status | open |
post_response | true |
post_response_author_avatar | https://yourapp.fider.io/static/avatars/letter/1/Test |
post_response_author_email | test@test.fr |
post_response_author_id | 1 |
post_response_author_name | Test |
post_response_author_role | administrator |
post_response_responded_at | 2021-07-09T15:29:57Z |
post_response_text | This is a response, still in *Markdown*. |
post_slug | example-dummy-post-title |
post_status | started |
post_tags | tag1 tag2 |
post_title | Example dummy post title |
post_url | https://yourapp.fider.io/posts/36/example-dummy-post-title |
post_votes | 7 |
tenant_id | 1 |
tenant_locale | fr |
tenant_logo | https://fider.io/images/logo-100x100.png |
tenant_name | Testing |
tenant_status | active |
tenant_subdomain | yourapp |
tenant_url | https://yourapp.fider.io |
Functions
| Function | Description | Parameters Type - Description |
|---|---|---|
stripHtml | Strip HTML tags from the input data | string - The input string containing HTML to strip |
md5 | Hash text using MD5 algorithm | string - The input string to hash |
lower | Lowercase text | string - The input string to lowercase |
upper | Uppercase text | string - The input string to uppercase |
markdown | Parse Markdown to HTML from the input data | string - The input string containing Markdown to parse |
format | Format the given date and time | string - The date format according to Go specificationstime - The time to format |
quote | Enquote a string and escape inner special characters | string - The input string to quote |
escape | Escape inner special characters of a string, without enquoting it | string - The input string to escape |
urlquery | Encode a string into a valid URL query element | string - The input string to encode as URL query value |
Don't forget to use the Preview field to help you experiment these functions!
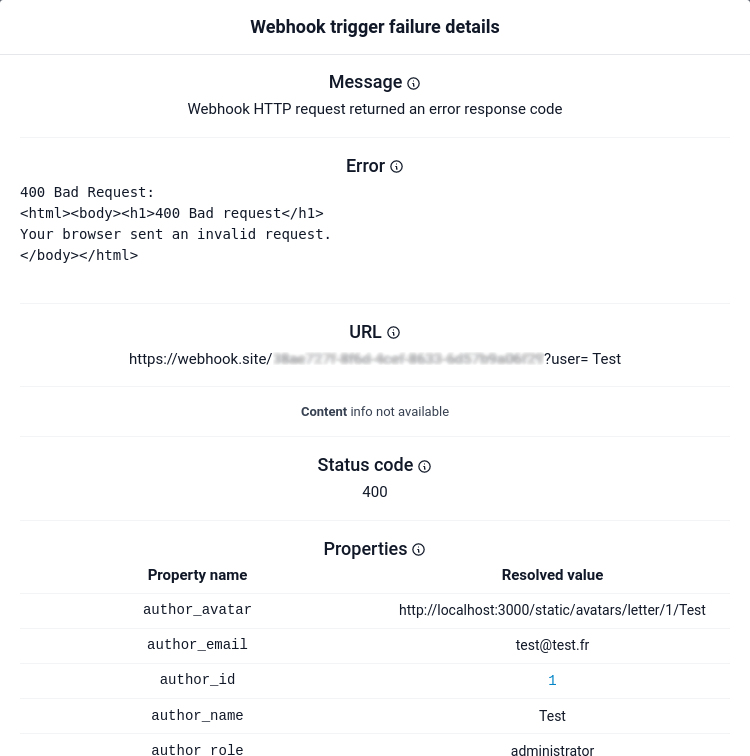
Webhook trigger failure report
This report is shown when a manual trigger of a Webhook goes wrong. It means your configuration is incorrect and you should not enable this Webhook now. A failed Webhook is automatically disabled until you edit it. It is a good practice to always test it after each edition to ensure nothing was broken.
Understanding the report
There is a lot of informations included in the report and it may be disconcerting the first time you see it.
First, the Message indicates where the process was interrupted, and why. Then, the Error shows what went wrong and caused the trigger process to stop. URL and Content are the parsed templates replaced with properties' values, helping you to understand the performed request. The Status code is the HTTP response status code returned by the request. Properties are every variables you can use in templates associated with their resolved values.
Testing
Before enabling any your Webhook on Fider, we highly recommend that you keep it disabled and use the Trigger button to confirm it's working properly.
Trigger button becomes available after creating a new Webhook. Whenever clicked, an event of the appropriate type is simulated, triggered only this Webhook. A notification in the upper-right corner of the screen indicate the result of the trigger. Once you're happy with the configuration, you can enable it and it will be triggered automatically with real properties every time the selected event occurs.
The result can be either a success: everything was good and the HTTP request was executed successfully; or a failure: something went wrong during the process. In case of a success, check your targeted application to confirm everyhing is OK, then you can enable your Webhook. However, if it was a failure, a report will be available beside your Webhook's name, by clicking on this information icon. Read more about Webhook trigger failure reports here.
Analyzing the message and error
Four error messages are possible:
- Could not parse webhook URL template
- Could not parse webhook content template
- Could not execute webhook HTTP request
- Webhook HTTP request returned an error response code
For each of these messages, the error field will bring more precise information about:
- What was malformated in the URL template
- What was malformated in the Content template
- What prevented the HTTP request from being executed
- What did the server respond to the request
Solving problems
In case of 1. or 2., you should verify your templates and do not hesitate to take advantage of the Preview area in the Webhook edition form. See Writing Go templates for more information.
Regarding the 3., it become more subtle. If anything, from the request sending, to the response reading, fails, it will be this error. First of all, verify manually the URL to check if you didn't made a spelling mistake in your app's domain name. Also, try pasting this URL in your browser to see if the targeted application is alive. On your application, be sure to reply and properly close the HTTP connection after Webhook handling. If you're trying to reach the Internet from an internal network, ensure your server can emit request to your application.
Finally, concerning the 4., the request was correctly sent to your application, but it was invalid. This can be caused by an invalid URL,
an inappropriate content, or even a missing HTTP header. Please refer to your application's official documentation and try to start with
basic example (sending Hello World seems to be a good idea to begin your debugging session).
A special case of failing could be the malformation of the result produced by templates with some values. Here are some recommendations about this:
- Properties passed as GET parameters in the URL query (i.e. after the
?) should always be encoded usingurlquery.https://example.org/webhook/fider?author={{ urlquery .author_name }} - When using a structured text format such as JSON, or any other format asking you to enquote an element, you should use the
quotefunction.{ "title": {{ quote .post_title }} }
When you think your problem has been solved, don't forget to test your Webhook before enabling it!
Common Webhook targets documentation
- Slack: Generic Webhook documentation, Create the Webhook, Webhook messages format
- Discord: Create the Webhook, Webhook messages format
- Microsoft Teams: Create the Webhook, Webhook messages format